JOURNAL
documenting
&
discovering joyful things
62 ideas for a letter

Hello! Before we get into this blog post, I just wanted to share some exciting news, that I'm on one of my favourite podcasts - Tea and Tattle - this week! We are talking all about letter-writing and slow-living and all kinds of other lovely things. It would make me feel so good if you popped on over and had a listen. I'd love to know your thoughts on the interview and I'm sure Miranda and Sophie, who host this podcast, would very much appreciate your visit. Here's a link to where you can listen, and read over all the extras in the show notes: https://www.teaandtattlepodcast.com/home/56.
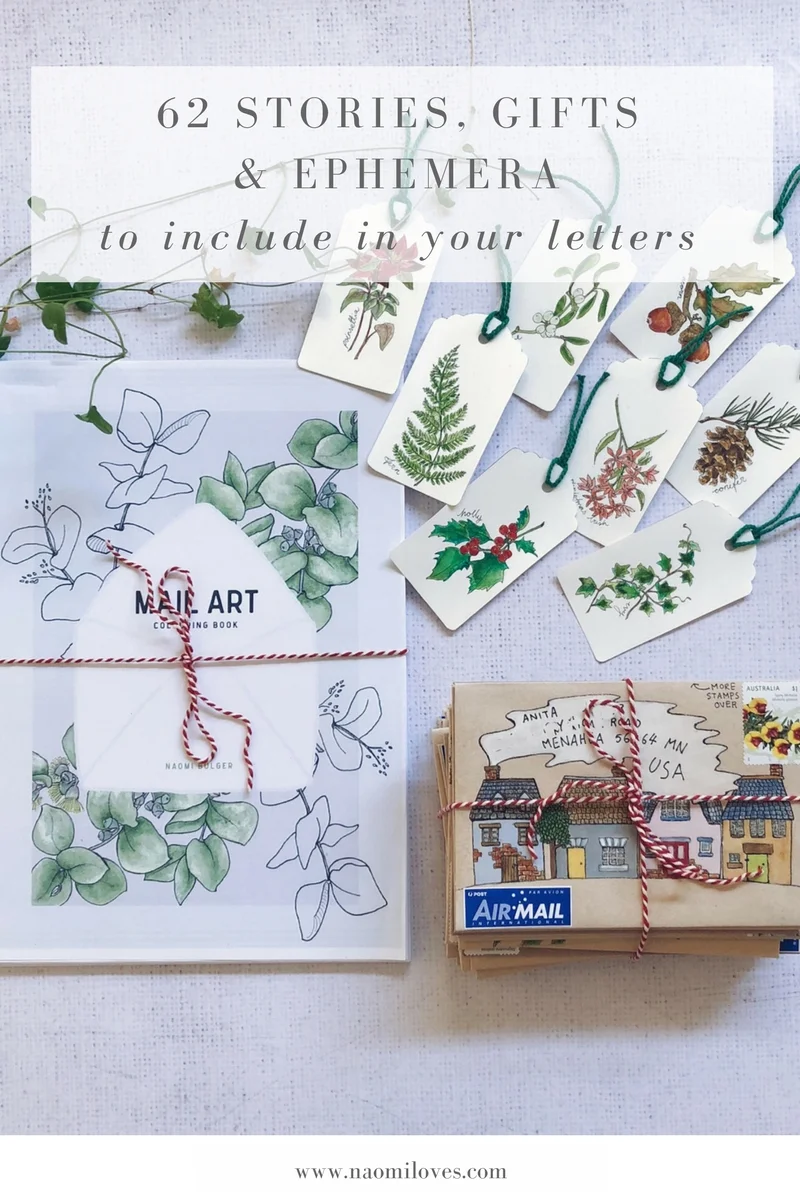
Still on the subject of letter-writing, I thought today I'd share some more of my illustrations from my Mail Art Colouring Book. I hope you like them! If you haven't come across this before, it's a downloadable colouring book with 62 illustrations on envelope templates, so you can colour them, personalise them, and post them. Creating all these illustrations was a genuine labour of love for me, and I've been so thrilled to see people using them, all over the world. It gives me goosebumps!
The colouring book makes a great Christmas present for anyone interested in mail, craft, or colouring, as well as for children, to inspire them to learn about snail-mail (my five-year-old daughter has coloured in almost every design, and posted several of them to friends). Because it's downloadable, it works at the last-minute, or as a little something extra to send to somebody overseas.
But a few people have told me that while they love the idea of a mail-art colouring book, they are not sure who they would write to, or what they would write about. To help answer their questions (and in case you have the same questions as you sit down to write your holiday letters, with or without mail-art), I've put together a list of 62 things you can write about or enclose in a mail-art envelope - that's one for every envelope-illustration in the book.
Just click the button below to download all the letter-inclusion tips.
Onwards to the mail art!


I'd love to know your ideas. What do you love to send in the mail?

Come join me and a host of gentle, creative, like-minded people in my five-week letter-writing and mail-art course, delivered entirely online. This course is all about creativity, personal connections, and spreading joy to others through the old-fashioned postal service. Learn more or join in here.
12 calm days of Christmas

I'm just popping in today to let you know about something I launched today, because I'd love you to join in! I want to find better ways to enjoy all the beauty of Christmas, without the stress and chaos, and I'm hoping to do it in your lovely company. If you subscribe to my newsletter you'll already know about this but, if not, this blog post is for you!
Christmas is a funny time, isn't it. On the one hand, the Christmas that many of us look forward to, the one in all the movies, is wonderful. A time of joy, generosity, good food, great friends, and a sprinkling of magic. But, on the other hand, the Christmas many of us actually experience is more aligned with chaos and stress than charity and love, and it fills our lives with to-do lists and engagements and obligations and expectations... not to mention all that stuff.
If you, like me, enjoy Christmas but not the chaos, I invite you to join me in a 12-day pep talk designed to help all of us rediscover the simple joys of this time, and navigate this busy time of year in a way that is calm and joyful.
Simply sign up for my newsletter via the button below to join me on a quest for a calmer, simpler - but still joyful and fulfilling - lead-up to Christmas.
Here's how it will work:
* Starting today, I will send you one short email every day up until Christmas Day, each containing some kind of tip or idea to celebrate the season in a joyful and non stressful way
* The emails are free and there's absolutely no obligation. (Essentially, I'm being selfish. I'm going through this process myself - of trying to find a softer, more gentle way to celebrate a season that I both love and fear in equal measure - and I'd really love to have your company on the journey!)
* While I absolutely respect your beliefs, I have deliberately made these emails non-religious, to ensure they are as inclusive as possible. Whatever you believe or don't believe, if you take part in Christmas, these emails are for you
Does that sound like your cup of tea (or mulled wine)? Simply join in via the button below, and I'll send you the first "calm Christmas" email very soon!

Horizons (+ podcasts for creatives)

Somewhere on the road in between Swansea and Binalong Bay, as the past four days of clouds scuttled out to sea and the tiny coastal towns rolled away behind us in fresh new sunshine, my own horizons began to open up, too.
Because, of course, holidays are as good for the mind as they are for the body. Bogged down in the everyday needs of meetings and deadlines and parenting and just, well, life, I couldn't see the path forward, and I had no idea what to do. I was so desperately unhappy in the work I was doing, but my financial obligations to my family meant I didn't have a whole lot of choice. Writing was the only thing I knew how to do that would earn me a 'real' income, and copywriting was the most reliable way to earn that income, but boy was it taking its toll. I was bored, tired, uninspired and unenthusiastic, and resented every second I gave to that work, which took me away from my children and from doing the creative things I loved.
But as the road unfolded in front of us and the children slept in the back seat, the salt air began cleaning away all that resentment and I began to spy, in its place, opportunity.

Creative thinking needs space to breathe, and the road and the sea breeze and the early nights were just the space my brain needed break free.
I came home and did something radical. I changed all my work priorities around to pursue my passions of art, snail-mail, and slow-living.
First, I built a new website (the one you're reading now). Then I created an e-course about snail-mail, using some of the content from the book I'd been writing for the past three years. Against all my expectations, the course sold out. Not once, but twice, and there's already a waiting list for a third intake.
While that was happening, I sat up night after night drawing designs for a unique colouring book that contained more than 60 mail-art envelope templates. I launched the colouring book as a downloadable product only, and pre-sold more than 100 in the first week I announced it.
All of this was happening late at night and early in the morning, to work around time spent with my children and on the day-job. But in October, I finally made the decision to quit copywriting. Financially this wasn't the smartest move, but boy it felt good. I spent a whole day sorting out my office and shredding secure documents from past clients, and if I'd been burning sage it could not have felt more cleansing. Ever since that day, I've sat down in my office on those three official 'work days' while the children are in childcare, and I work on the things I truly love.
The income side of it is a bit messy. I illustrate for commissions. I make e-courses. I'm a TA for another online educator. I write magazine articles. I write books. I illustrate books. All of that adds up to the very bare bones, a lot less than I was earning before, yet I'm working harder than I ever have before. But every day, when I sit down at this little office, it is with joy.
I'm so full of energy and ideas that the day flies past, and when I stop work to go and pick up the kids it almost feels like waking up from a dream. Awake, and satisfied that I've given this work my all, I'm also in a much better place to give my kids my all. My time is all theirs and, again, it is with joy.
I have so many plans I don't know what to share with you first. Honestly I don't even know why I'm writing this blog post, other than that I just feel so free and happy to be working so hard on what I loved, that I wanted to share. And I want to thank you for reading this blog, and for supporting me in so many ways.
Whether its buying my courses or products, reading my blog or newsletter, commenting to let me know you're there on Instagram, or in myriad other ways, you are the community that has kept me going. You've told me what you liked (and didn't like), what you wanted, and how you wanted it. You inspire me every day to make and give away new things, and I'm just so grateful for the support and inspiration.
Here's to new horizons. Here's to you!

ps. At night time in Tasmania, while the children and my husband all slept, I started listening to podcasts to find inspiration and practical ideas for turning what I love into the way I make my living. I'd make a cup of tea, put in headphones so I wouldn't wake my family, curl my feet under a chair in our holiday house, and listen in. It felt like private coaching from a whole host of experts, right at the time I was dreaming about a new way forward. I've shared my favourites of those podcasts here, in case you're searching, too.
Podcasts for creative people in business
Courage & Spice: the podcast for humans with self doubt
by Sas Petherick
The blurb: "If self-doubt is holding you back in your relationships, career, creativity or your business, Courage & Spice is especially for you. You’ll find inspiring conversations about all things self-doubt – including real-life stories and research-led approaches to help you navigate through it."
Explore Your Enthusiasm
by Tara Swiger
The blurb: "Let's explore what it takes to craft a sustainable, profitable, FUN business, while staying enthusiastic and motivated. Whether you just opened your first Etsy shop, or you've been selling your art, design or writing full-time for years - you struggle with doubt, loneliness, motivation and getting it all done. In this podcast we'll explore what you REALLY want from your small business so that you can follow your enthusiasm, make your art and make money. Each episode is a mini-lesson in exploring what you want out of your OWN business, so that you can craft a life and business that fills your life with enthusiasm."
Hashtag Authentic - for Instagram, Blogging and Beyond
by Sara Tasker
The blurb: "Want to find an audience online for your creative work? Hashtag Authentic is a weekly podcast exploring the secrets to online success for dreamers, makers and creatives. With practical tips and inspiring stories, Sara Tasker of 'Me & Orla' guides you through the lessons and strategies she used to grow her 250k+ audience and six-figure business online. Tune in every Wednesday for analysis and interviews with trailblazing creatives, for an insider's view of all things Instagram, blogging, social media and beyond. Hashtag Authentic will equip you for the online world, dose you up on inspiration & information, and help you find your online tribe."
Make it Happen: a podcast for big hearted creative business owners
by Jen Carrington
The blurb: "Make It Happen is a podcast for big-hearted creatives who are ready to build an impactful, fulfilling, and sustainable creative life. Brought to you by Jen Carrington, a creative coach, this podcast is for you if you're ready to make things happen in your creative work and life on your own terms, in your own way, and by your own rules every step of the way."
My Open Kitchen
by Sophie Hansen and Skye Manson
The blurb: "My Open Kitchen is a podcast celebrating great stories from behind the farm gate, inspiring people, seasonal produce and the power of social media to help us all connect, collaborate and build communities."
Soulful PR Podcast
by Janet Murray
The blurb: "Learn how to get PR for your business that will help you grow your email list, social media followers and your client list. If you’re an entrepreneur wanting to get coverage in newspapers, magazines, and on radio & TV, tune in every Friday for insider tips and easy-to-implement strategies from award-winning Guardian journalist Janet Murray. You’ll hear inspiring interviews with entrepreneurs who are using traditional PR alongside blogging, webinars, email marketing and social media platforms like Facebook, Twitter, Pinterest, Instagram and Youtube to attract leads and grow their business."
The Membership Guys Podcast
by Mike Morrison
The blurb: "Weekly episodes containing proven, practical advice, strategy and tips for planning, creating and growing a successful membership website."
Pursuit With Purpose
by Melissa Griffin
The blurb: "I know first hand that it's way too easy to slip into the rat race of competition and comparison. In 2016 I hit my first million-dollar year in my business... yet, I was totally miserable. At the time, I was focused on numbers and status, rather than what would actually bring me real happiness and create an impact on the world. That all changed. This podcast is about my journey to meaning and fulfilment and how you can bring it to your own life - today and every day."

Postcards versus Instagram

Can we talk about postcards for a minute?
Postcards were the social media of the 20th Century. They were short and pithy, widely available and affordable, sometimes frivolous and often impermanent, and pretty much as close to instant as things got before the digital age. And when it came to celebrating special events, they postcards were possibly more popular a century ago then than social media is now, if you can believe that.
Once I read in an article my friend Selise had written that on just one single day in 1906, famous Brooklyn theme park Coney Island Post Office processed more than 200,000 postcards. That's a big number by anyone's standards, but to help put this into perspective, I pulled out a calculator and made some comparisons.
- During its heyday in the first decade of the 1900s, Coney Island regularly attracted crowds of more than 100,000 people a day
- On any given weekend, that crowd would routinely send more than a quarter of a million postcards to family and friends (more than 125,000 postcards a day)
- And then on that one day the 100,000-strong crowd posted more than 200,000 postcards
I tried to think of an equivalent for my time and place. We don’t have any theme parks here in Melbourne, Australia, so the closest I could come up with was the annual Royal Melbourne Show. It runs for 10 days each year and in that time attracts approximately half a million visitors.
In 2016, Instagram photographs tagged for the Melbourne Show from all 500,000 attendees totalled close to 65,000. (I got to this figure using a combination of the hashtags #royalshow, #royalshowselfie, #royalmelbshow, #royalshow2016, #royalmelbourneshow2016, and #melbourneshow, which were the key ones I could find).
So my maths isn’t great but if you divide the Melbourne show attendees and Instagram posts by 10 to get a day rate, that’s 50,000 people snapping and posting 6500 photographs on their phones, or every seventh person at the show sharing just one photo.
On the other hand, in just one day in 1906, those 100,000 people I mentioned purchased, wrote on, addressed and stamped and posted 200,000 postcards. That's two postcards per person, 18 times as many as the Instagram posts.
I don’t really know what I want you to do with that information, other than possibly to find it as mind-blowing as I do. I mean, my research wasn’t scientific and I realise we should probably add Twitter and Facebook to that tally, if only I could get the information, but still... On the other hand, people generally use more than one hashtag per photograph, so that 6500 is probably a very generous tally – it could well be a lot less.
And my friend, 200,000 postcards is a LOT of postcards in one day.
I got so obsessed with this statistic that I even made a little hand-painted infographic to illustrate it. (I know, I need to get out more. Go see a movie Naomi!).

(You can download a PDF of this infographic here if you'd like to use it).
I like to picture those carnival-goers of 110 years ago, stopping to catch their breath after a ride on the roller-coaster, or relaxing for a cup of hot tea or maybe even a scoop of ice-cream (such luxury!). I imagine the men wearing boater hats, and the women in those glorious Edwardian dresses you see in etchings. Holding parasols. There are hawkers and performers and musicians roaming everywhere, in my imagination, flanked by carnival sideshows and wooden rides, too many to count, offering every kind of thrill and wonder to the fun-seeking crowd. From a stall somewhere my lady and gentleman have purchased postcards and stamps, and now they sit down on a wooden bench to write.
Wish you were here.
Arthur rode the loop-the-loop
Shooting the chutes at Luna Park. Such gaiety!
And in the days and weeks to follow, all over America and the rest of the world, tiny messages begin to land in people’s postboxes. They were tangible tweets or Insta-moments, bearing the marks and scars of a long journey; with messages in scrawling script or halting print, bold capitals or containing just a signature; decorated with stamps. On their reverse, an illustration or early photograph, a window to elsewhere.


The heyday of postcards
- There were 1.76 million postcards issued in the US in 1875. By 1910, that number had increased to 7.26 million postcards issued
- The cost of posting a postcard in the US remained 1 cent for 30 years, from 1898 to 1928, except for a few months in 1925 when they were 2 cents
- Women sent three times as many postcards as men
- People were over-sharing way before social media: “There are people who would write anything on a ‘postal,’ from a recipe for fruit cake to the last quarrel that they had with their husbands.” Baltimore Sun, 1903
- Today in the US it costs 34 cents to send a postcard (here in Australia, the cost is $1)
So this is my challenge to you: before your next tweet or Insta-share, send somebody a postcard! I guarantee you will make their day.

Botanical project: leaf skeletons (non toxic)

Whenever I discover a leaf skeleton in the garden it feels like a little piece of magic. Rare good luck, like finding a four leaf clover or seeing a double rainbow. The circumstances for nature to create a leaf skeleton have to be just right: damp enough for the fleshy parts of the leaf to decompose, sheltered enough (probably under other leaves) to encourage microscopic organisms to eat away at those leaves, and somehow exposed at just the right time for me to find the leaf while all those lovely veins are still in place, before it breaks or blows away.
I love to send leaf skeletons as gifts in my mail. They are something special, precious, a memento from my garden or a walk I've taken that is tinted with enchantment. But because they are so hard to find, I wanted to learn how to help nature along, and make my own leaf skeletons. Turns out there are several ways to do it, following processes that range from a couple of hours to a couple of weeks, and using everything from water and pantry ingredients to caustic substances requiring rubber gloves and goggles, and straight-up bleach.
I have tried three of the non-toxic methods, and am here to share them with you today.
Step 1: Pick & prepare the leaves
No matter what method you use, some steps to making leaf skeletons are always the same:
Choose your leaves: for best results, choose leaves that have a strong vein system. Tougher, more waxy leaves have better results than softer, younger leaves
Clean the leaves: gently rinse them in a bowl of water, and wipe any dirt or mud away with a soft cloth. If the dirt is stubborn, use an old toothbrush to (gently) scrape it away
Step 2: Choose your method
How you choose to make your leaf skeletons will depend on the time you have available, the materials you have in the cupboard, and how willing you are to work with potentially caustic substances. Here are the pros and cons of the three methods I'm sharing today. If you click on any of the methods below, you'll jump straight to the relevant instructions.
Pros:
* Completely safe
* Nature's method
* Gentle on leaves
Cons:
* Takes several weeks
* Gets gross and smelly
Pros:
* Completely safe
* Easy to find ingredients
* Relatively fast results
Cons:
* Can be rough on leaves
Pros:
* Supposedly faster
* The Internet loves this method (lots of tutorials)
Cons:
* Dangerously caustic
* Hard to find ingredients
* Can be rough on leaves
Step 3: Make your leaf skeletons
a) Water method
Take a shallow dish (like a baking dish) and fill it with water. The dish should be ceramic or glass, not metal (I don't know why. Maybe it's to avoid rust, or has something to do with the minerals or chemicals in metal?). Place the leaves in the dish (it's ok if they're on top of each other) and weigh them down with something heavy to ensure they stay covered with water.
Leave the water to sit for between three and four weeks. It will get murky, and start to smell really bad (like a vase when you've left cut flowers in it for too long).
Take one leaf out of the murky water, place it on a flat surface, and gently try to brush away the gunk and membrane from the leaf. Use an old toothbrush (softly), or a paint brush if you're worried the toothbrush will break the leaf. If it's too tough, put the leaf back into the water and give it a few more days to soak.
Rinse the leaf in clean water. If necessary, continue brushing away any remaining pieces of the pulp while it's in the water. Once you're done, lay it on a paper towel to dry.
b) Bicarb soda & baking powder method
Dissolve equal parts bicarbonate soda and baking powder in a saucepan of water. I used one tablespoon of each, and approximately a litre of water.
Place your leaves into the pot, and bring it to the boil. Reduce to a simmer, stirring it gently from time to time. The water will froth up, and will get brown and murky.
Watch the leaves until they have softened, and you think they are ready to clean away. This could take several hours (I was using hardenbergia leaves and it took about an hour and a half). If necessary, top up the water from time to time to ensure they leaves remain covered.
Take the leaves out of the saucepan and place them into a shallow tray of clean water. Using and old toothbrush, gently try to brush away the gunk and membrane from one leaf at a time. If the leaf is too fragile, use a paint brush instead of a toothbrush.
Once you're done, lay the leaf on a paper towel to dry.
c) Washing soda method
Note: washing soda is not the same as baking soda. Washing soda is sodium carbonate: it's a powerful cleaner and non-toxic, but is highly caustic and definitely not edible. Wear gloves and goggles while working with it, and try not to inhale any dust that might float up when you stir.
In a saucepan, dissolve 3/4 cup of washing soda in about one litre of water.
Place your leaves into the pot, and bring it to the boil. Reduce to a simmer, stirring it gently from time to time. The water will froth up, and will get brown and murky.
Watch the leaves until they have softened, and you think they are ready to clean away. This could take several hours (for some reason the camellia leaves I was using took forever - like about six hours - but general consensus on the Internet is up to two hours). If necessary, top up the water from time to time to ensure they leaves remain covered.
Take the leaves out of the saucepan and place them into a shallow tray of clean water. Using and old toothbrush, gently try to brush away the gunk and membrane from one leaf at a time. If the leaf is too fragile, use a paint brush instead of a toothbrush.
Once you're done, lay the leaf on a paper towel to dry.
How to make washing soda
If you can't find washing soda at the shops, try this easy at-home process.
Pre-heat your oven to 200C (400F). Spread two cups of baking soda evenly on a large baking tray, and place it in the hot oven for about half an hour. You'll know the transformation has happened when you look at the powder: washing soda is more grainy and dull than baking soda, and when you stir things around (not with you fingers!) you'll see it doesn't clump together. If you're not sure, grab some baking soda and put the two side by side, to see if they look different.
Step 4: Press the leaves
Leave cleaned leaf skeletons in a warm, sheltered place to dry for approximately one hour.
Once you are sure the leaf is completely dry, place it between two paper towels and store it under a heavy book until you are ready to use it.
Step 5: Decorate
I prefer to leave the leaf skeletons their natural colour, but you can absolutely play with other decorative ideas if you wish. After all the pulp has been removed but before you dry and press the leaf skeleton, you could place it in bleach to whiten it, or in food colouring. Alternatively, once dried and pressed, you could carefully paint the leaf skeleton (metallics look really great!).
That's it! If you decide to make these, let me know how you go. I'd love to see how they turned out, and learn what you think of the process.
ps. I've been working on a little video to show people how to make leaf skeletons using Method 2 (the baking powder and bicarbonate soda method), as part of a "botanical crafts" course I'm developing. The video is not finished yet but, in the meantime, I've created a printable tutorial using screen-grabs from the video to give you a more visual step-by-step guide, if you think that will help. You can download that tutorial here:

The Most Beautiful Letter You Have Ever Written
Come join me and a host of gentle, creative, like-minded people in my five-week letter-writing and mail-art course, delivered entirely online. This course is all about creativity, personal connections, and spreading joy to others through the old-fashioned postal service. Learn more or join in here.

Composting for tiny gardens (even courtyards & balconies)

Hello! This is my city garden! It is the size of a single car-space, because until two years ago, it was a single parking space. We gave up having a guaranteed place to park our car in favour of creating a green room in which to relax, ponder and play, and it was the best decision we made in our entire home. The photograph above was taken last week, while I was cleaning up after a garden party during which we had had 40 guests over for afternoon tea. It was a warm day, and there were not one but three compost receptacles decomposing away in this very small garden. But nobody could see them, and nobody could smell them. Hurrah!
How did we do that?
In my ongoing quest to reduce waste in our home, and lessen our impact on the planet, it has particularly irked me that we didn't have a composting system. Even after we built the garden, I continued scraping mountains of food-scraps into the bin every day.
Essentially, space was the problem. Even the smallest of compost bins were quite big in relation to our garden. They'd create a giant, plastic eyesore, taking up precious growing-space. And, more to the point, occasionally smelling bad. (I know, I know, properly managed composts don't smell. Much. But if your garden is so small that you can all but touch both sides of it when stretching out your arms, that puts you in very close proximity to the compost no matter where you go. I live in Australia, friends. Things get hot in the summer. Pile as much dry matter and mulch as you like into that bin, the stench of slowly rotting watermelon rinds and browning banana peels will find a way to cut through, as do the sandflies. It's gross.)
Day after day I kept scraping rinds and pulps into the rubbish bin, wishing I could scrape the guilt of my wasteful habit away with them. And to add insult to injury, I was paying good money to buy compost for the the garden in spring-time! I did my best to keep the waste low, by planning better, shopping smarter, and being more creative with my cooking. Thanks to the magic of the Instagram community, for example, I now have a host of delicious ways to use the green parts of leeks in my cooking. Recently I've learned how to dye fabric using avocado seeds and skins. But still, the rubbish bin is full of compostable matter every week.
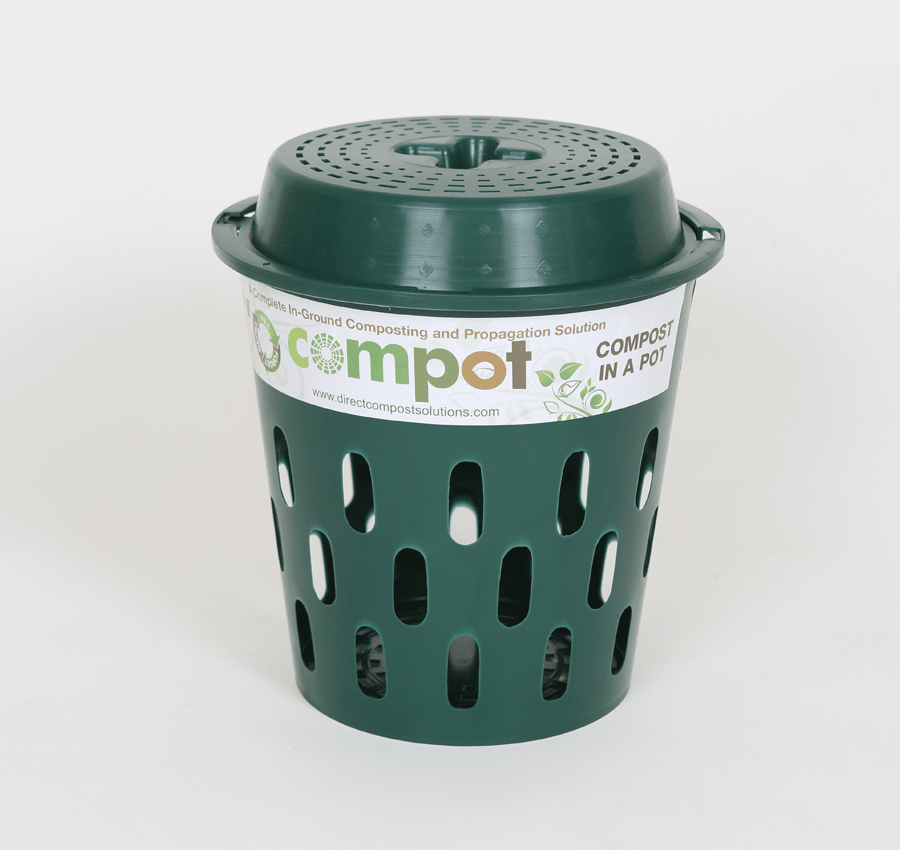
Or I should say, was full. Enter the composting cannon.
Fair warning: I am about to wax lyrical about this product. I'm not being paid, sponsored or in any other way encouraged to say this stuff. These links are not affiliate links, and these makers don't know I'm writing this blog at all. I'm just thrilled to finally have found a solution to my organic waste problem.
(BTW in case the composting cannon doesn't appeal to you, I've also provided a bit of a product round-up of some other fantastic composters for small spaces, as well as beginners tips on composting, at the end of this blog post.)

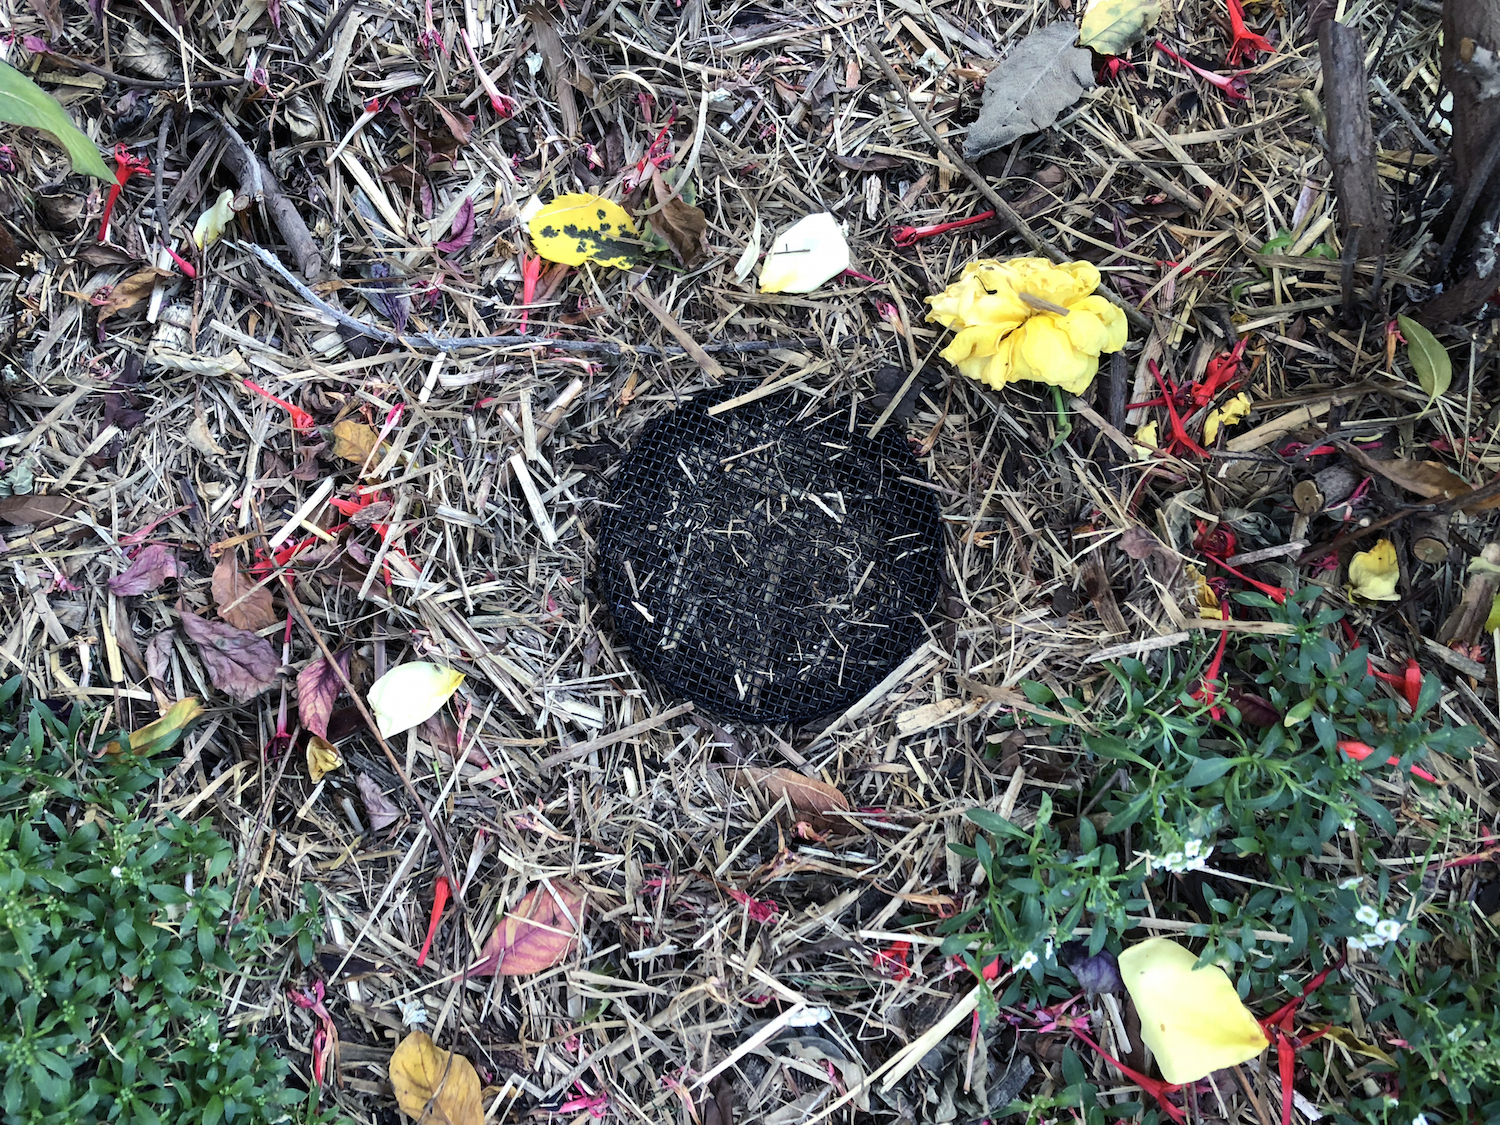
I discovered this little Australian invention at the CERES Community Environment Park, but you can also buy it online here. It is such a simple idea. You simply bury the cardboard cylinder in your garden (or in a planter box or big pot). Empty your food scraps into the cylinder, add a bit of mulch or shredded paper for dry matter, and push it down with the plunger provided. There's a mesh lid that keeps vermin away, holes in the side for worms to make their way through, and the whole thing breaks down over many months, delivering compost direct to your garden!
When I first took mine home, I couldn't quite figure out how it worked (it was just too simple - surely I was missing something!). So I've created a kind of mini tutorial for you in case you want to try it yourself.
How to use the Composting Cannon in a tiny garden

Step 1: Take the cannon out of the box, stare at it a while, and scratch your head. It will look like the picture above. There will be three cylinders, all with holes in them, each one fitting inside the other (like matryoshka dolls). Wire lids sit on both ends. Finally figure out that you have actually bought three "cannons" for the price of one, and feel very silly for not realising this in the first place. Separate them out. The wire lids are sized to fit the different width cylinders.

Step 2: Find somewhere in your garden where you can dig a hole about 12 centimetres wide, and 30 centimetres deep. If you're using pot plants, as long as the pot is at least 30 centimetres deep, you can use that just as easily. (The only challenge will be if your pot is too shallow - you don't want part of your composting cannon sticking out the top, looking ugly). Bury the cannon, leaving just enough of the rim sticking out of the top so that you can fit the wire lid over the top.

Step 3: It's ready to use! Tip any plant-based food scraps you like into the cylinder (some tips: citrus, onions, dairy and vegetable-fat products will slow down the composting process so should be minimised; and meat and animal fats should be kept out altogether because they attract rats - and smell really bad. There's a more extensive guide to what should and shouldn't go into a compost in the download at the end of this post). Now add a handful of mulch, dry leaves or even shredded paper on top. Use the plunger (it comes with the kit) to push everything down, then put the lid back on. Repeat this every time you have more food scraps, and that's it.
There is literally no maintenance - the worms do all the work for you, not only breaking down the scraps and creating the compost, but then carrying that compost through your garden or planter box, delivering it directly to the roots of your plants.
According to the website, each of these cylinders will compost more than 20 kilograms of organic waste during a four-month period. So with three, that's more than 60 kilograms transformed from stinking landfill into beautiful, nutrient-rich compost for the garden.
This is a really unobtrusive composting system. My three, when I'm not topping them up, look like the picture below. Actually they look even less obtrusive, because wind and birds cover them each day with the mulch, which I had to move aside to take this photograph.
The contents of your cylinders (and the cylinders themselves) will start to decompose after about four months. It takes even longer than that for them to start to be unusable, after which you can replace them (they are not expensive to buy, especially when you consider how long they last) and start all over again, adding more nutrient-rich compost to other areas of your garden or potted balcony.
One last thought: I do think you need to be somewhat realistic about just how much food waste you can fit into these little babies. We are a hungry family of four and, thanks to 50 percent of our family being pre-school aged, a lot of food gets dropped, tossed, played with or otherwise rejected (especially the vegetables!) so we tend to generate a lot of waste. On some days, when (for example) we've eaten through four bananas, made freshly-squeezed orange juice for the whole family, had a few slices of watermelon, and made a vegetable stir-fry for dinner, we can fill an entire cannon in one hit. If I've filled all three in quick succession, I do sometimes have to wait a few days and go back to putting the food scraps in the bin, until the food breaks down a little. So that's not ideal, but it is still a LOT better than our previous habits, and a great result for a tiny, inner-city garden.
Clever composting solutions for tiny gardens
Here's a quick round-up of some innovative composting solutions I've discovered online that appear to be great for reducing organic waste and creating garden nutrients when you only have a small space in which to work. (Remember I've only tried the Composting Cannon. I think I'll try the Bokashi next, and the two systems can supplement one another).

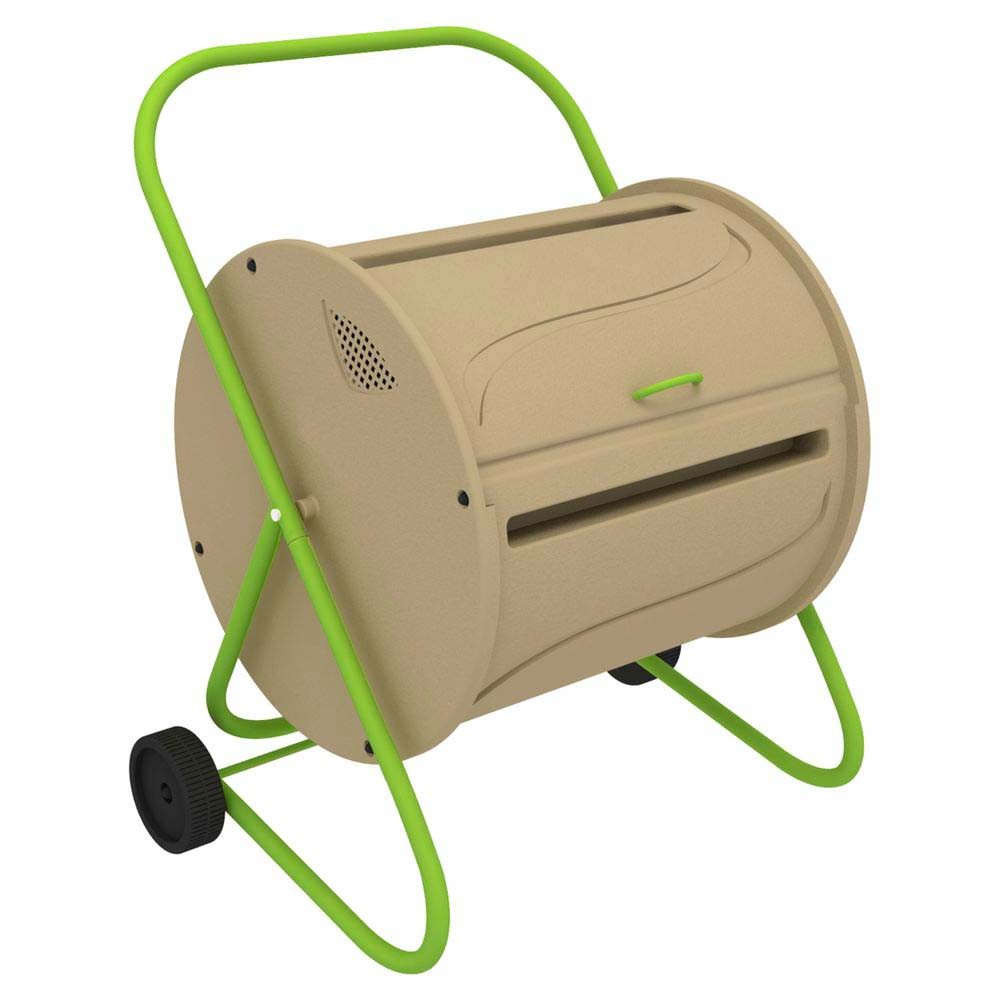
* Tumbleweed Compost Tumbler: a barrel on a stand than can be spun every couple of days to aerate the compost without needing to dig or turn

* Bokashi scrap fermenting: a system that is used to actually ferment kitchen waste (including meat and fish) by using micro-organisms to break down scraps, without creating bad smells

* Hungry Bin: a continuous-flow worm farm, on wheels so you can move it around your garden or balcony
What do you think? I'd love to know your ideas or experiences on composting or otherwise reducing and reusing food waste in small spaces. And in the meantime if you're keen to get started but this is all new to you, I've created a handy, guide below with some basic tips on composting for beginners (including what to include and what not to include in a healthy compost), whatever system you decide to use.

How to use mail-art templates
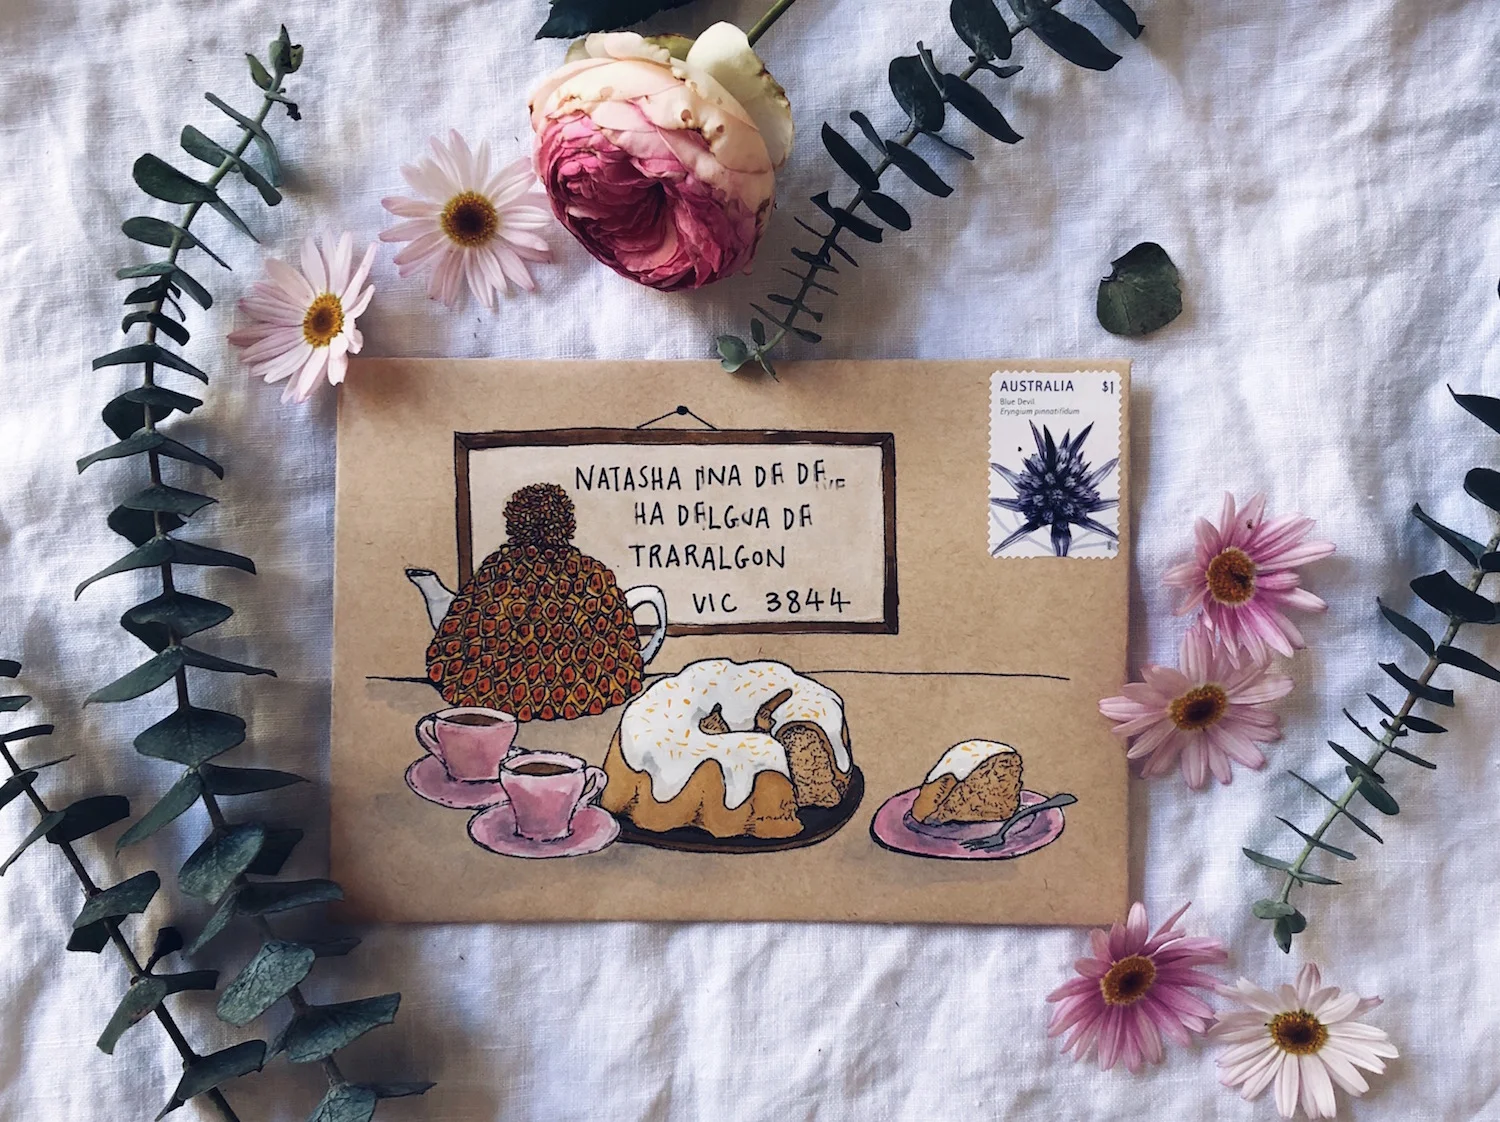
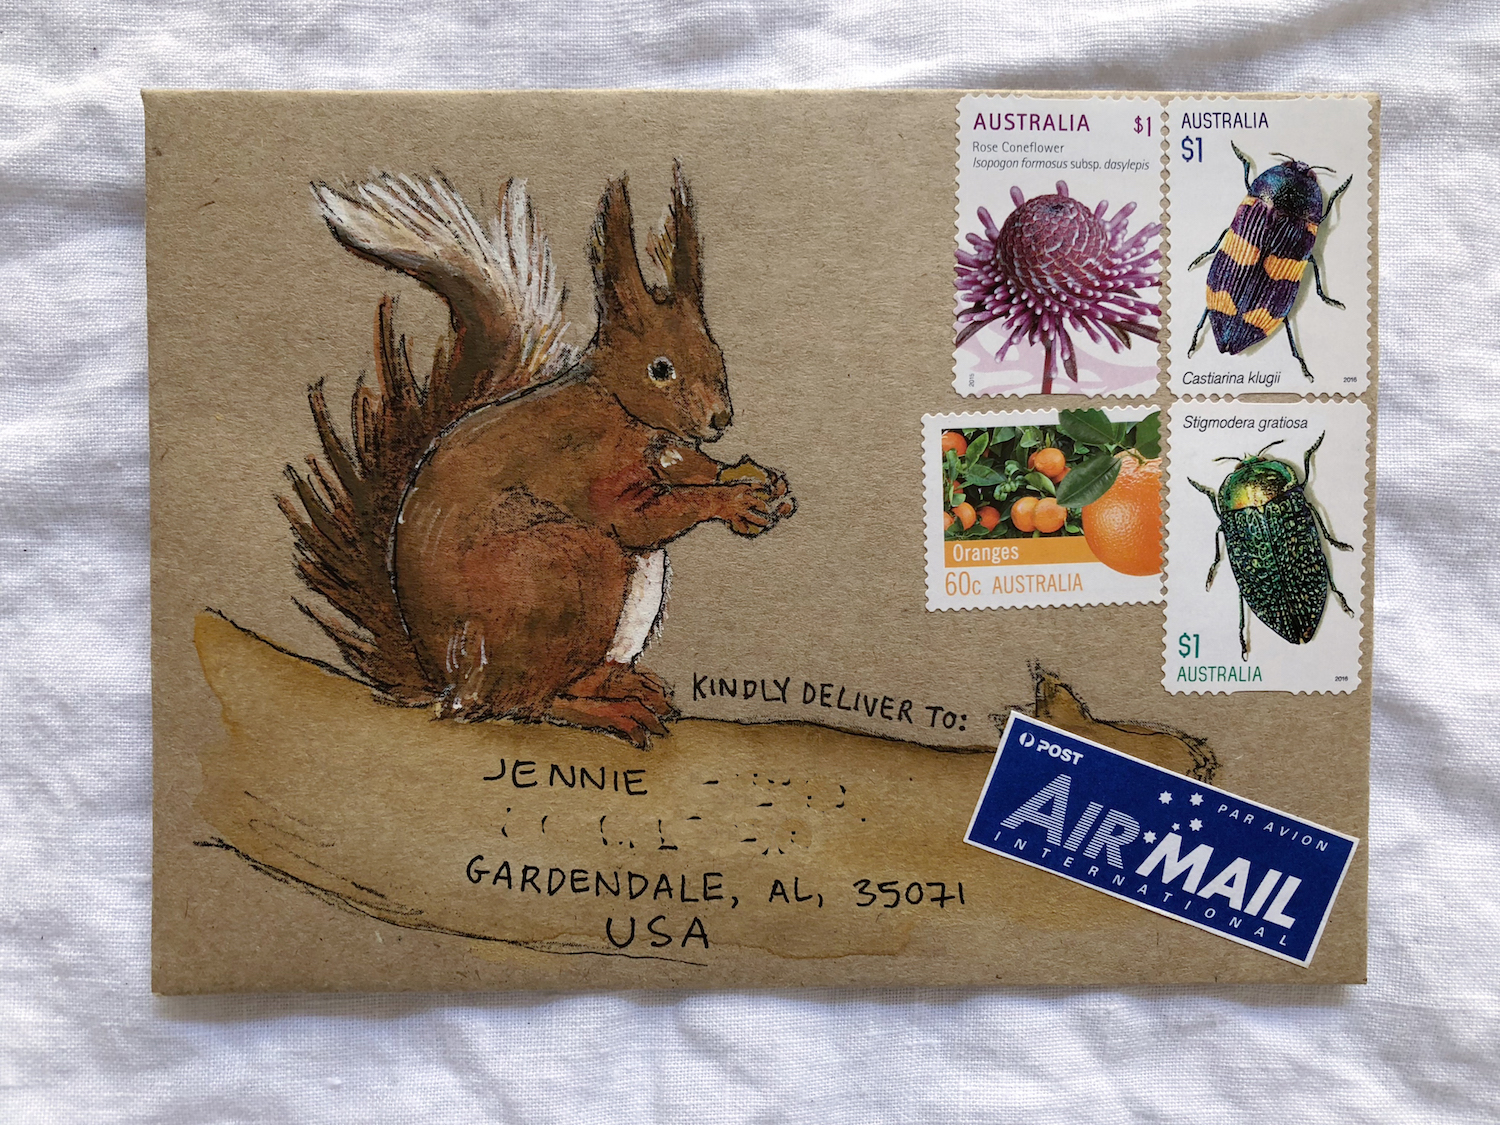
It’s been a while since I shared my mail-art on this blog, so I thought I’d show you some of the envelopes I’ve been making and painting lately. These are all my original drawings but instead of drawing them directly onto the envelopes as I normally do, I printed these from templates I created for my Mail Art Colouring Book.
If you haven't come across it before, this colouring book contains 62 original mail-art designs, ready for you to download, colour and personalise so that you can make your own mail-art that looks like (your own version of) the envelopes on these pages. The designs vary in complexity (some are detailed and intricate for folks who like to colour for mindfulness and relaxation; others are quite simple so you can make beautiful mail in minutes, or get the kids involved), and there are loads of designs and themes, including several for Christmas and other holiday mail.
Each month, I also share new templates in my free newsletter, which will re-start in the New Year. So with all these templates floating around, I had a thought… if you use the newsletter or the colouring book (or both!), maybe it might be useful if I was to provide you with some tips on really making the most of these designs for your mail. All the templates are super easy to use and personalise, but in this blog post, I've tried to answer all the key questions that people ask me about making my own mail-art. Things like the paper and card-stock I choose, painting and colouring tips, and thoughts for maximising their chances of success in the post.
Even if you don't use the templates, I've created a download below that you might like to use. It summarises these tips, but also includes a blank envelope template for you to create your very own mail-art design. Either way, I hope this helps you. Please feel free to ask any questions in the comments if I haven't answered them here, and I'll try to update the post to help you. Likewise, I’d love to know if you have other mail-art tips you could share here with others, and would be thrilled to see what you create!
Finally, if you’d like to sign up for my free newsletter with the monthly templates, or buy the Mail Art Colouring Book for yourself or a friend, simply use the buttons below.


Step 1: Choose and print a design
Follow the link I give you (either in the free newsletter or the colouring book) to access the template. It will be a PDF document, A4 size. That means you’ll be able to print it onto standard copy paper (either A4 or US Letter) to fold into an envelope that is approximately 16 x 11 centimetres (or 6.33 x 4.5 inches) in size.
Choose the paper or card onto which you want to print. These envelopes can definitely be made from standard copy paper. People worry that this is too thin to survive the post, but think about the business envelopes you receive in the mail - they are just as flimsy, sometimes even more-so!
Personally I like the look of brown, recycled kraft paper. I try to find paper that is a little bit thicker (copy paper is normally about 80gsm and the envelopes you see in these pictures were made with 120gsm paper), because I choose to paint my envelopes, and paint can buckle the paper. If you can’t find thicker paper or don’t want to, you can flatten painted envelopes by resting them under some heavy books overnight after the paint has dried.
Step 2: Make the envelope
Cut out around the edges of the template. Now turn it over so that the design is face-down on the table. Fold the back up, and the sides in.
Now run a glue-stick down the sides, and press the back to them so that they create the envelope. I always say use a glue-stick because liquid or paste glues are too bumpy, and spray glue is too hard to keep to just one space (you don’t want to end up glueing your envelope shut!). Fold the top of the envelope down, ready to be sealed later on once your letter is inside it. Now turn it back over.
Step 3: Colour the design
You may want to paint, like me, or use pencils, markers, pastels (with a fixative afterwards) or anything else you like. I use watercolour and gouache, outlined in waterproof ink. Whatever your medium, here are some tips to help make your mail sing.
* Shadows: look at the designs and think about where the shadows would be in this picture. Things get darker in corners, for example, or under ledges (under ridges of shelves or pot plants, under leaves when one overlaps the other, under the chins of animals, etc. Look for curves in the picture and think about where shadows might be. I tend to paint my ‘standard’ colours first, then add watery patches of blue or grey to the shadow areas. So for example you can see greyish-blue making shadows on the white icing of the bundt cake above, around the base of the hanging pot-plant, and on the faces of some of the letter-boxes. Other times I just use a darker version of the colour I’ve chosen, to create shadows.
Shadows make your pictures seem three-dimensional. Even if there aren’t obvious places for shadows in the designs, you can create this three-dimensional effect by imaging the scene is next to a window, with the light streaming in from just one side. So in the mail with the tea and cake, for example, you can see shadows on the left-hand side of the cups. And the same on the posts of the letter-boxes.
* Colour: bright or subtle, it’s up to you. But you need to make sure that the postie can easily read the address and this means keeping the areas where you’ll be writing the address light and bright. In the post boxes, for example, I made some of the ‘writing’ areas white. On the Australia Post box, which is normally red, I added some white so the black text would still stand out. On the barn door, ordinarily that would have been a darker brown but I lightened it to make the address pop.
In the areas where you write the address, it’s also wise to keep things simple and stick to just one colour or shade. But in other areas, mixing things up a little will make your design look that much more special. So for example on the Christmas holly wreath, I chose to make the leaves light and dark instead of just flat green. It’s hard to see in this photograph but there are also two colours to the berries - dark red and a kind of fire-engine red. It doesn’t look like much but if the colours were all the same, the picture would be a lot more flat.
Step 4: Get it ready to post
Write the address where it belongs in the design. To help you, there are suggestions at the bottom of all designs in the Mail Art Colouring Book indicating the best place (or places) to write names and addresses. Of course there are no rules and you can switch things around if you need to, but I’ve planned each of these illustrations to help you create lovely mail-art and ensure that the postie can see where to deliver it.
Make sure the address is written in something waterproof (like waterproof ink) so that the address won't run or blur if rain gets on the envelope.
If you think the address might be even a little hard to find in your design, use arrows or words (like “Kindly deliver to”) to point the postie’s eyes to where the address starts.
Put a stamp on the top right-hand corner of the envelope. You’ll need to look up your country’s postal rules to learn how much this needs to be. These envelopes are standard sized, but depending on how thick or heavy you make them, and how far they go, this will impact the cost of the postage. If you think you need to add more stamps and they won’t fit without ruining your design, write a little note underneath the stamp saying “More stamps over,” then add more to the back of the envelope.
On the back of the envelope, write the words “Sender” or “From” and then your own address. This way if your mail-art can’t be delivered, it will come back to you and you can try again. Make sure that if you have put stamps on the back of the envelope as well as the front, you do write the word “Sender” or otherwise above your own address, so the postie doesn’t confuse this for the recipient’s address.
Once you’ve put your letter and anything else you want to send inside, close the envelope, and seal it up with glue-stick or sticky-tape. Add anything else you feel like. A wax seal, a sticker in place of a seal, washi tape… whatever suits your style!
Don't forget your free download!
Use the printable below as a handy list to recap all my tips above. Use the blank envelope template to create your own mail-art design (be sure to leave space for a stamp at the top-right, and make sure the address area is clear for the postie).

Why we all love brownies

What is your go-to comfort food recipe? That one thing you can bake, stir, chop or pick that cheers you when you're down, makes any celebration sweeter, or reminds you of someone - or somewhere - that holds a special place in your heart.
Turns out that for many people all over the world, it's brownies. Rich, sweet, gooey, chewy (and easily made gluten-free) chocolate brownies.
When I launched the "meals in the mail" project a few months back, I asked people to do two simple things:
1. Send me their favourite recipe in the mail, and
2. Tell me what makes it special to them
Now as I sort through all the heartfelt letters, delicious recipes and creative mail that came my way, themes are starting to emerge. And one of those themes is this: everyone loves brownies.
I tender in evidence, these seven recipes.
Sonya in Australia, for example, shared her recipe for dark chocolate brownies with salted caramel (below). She said:
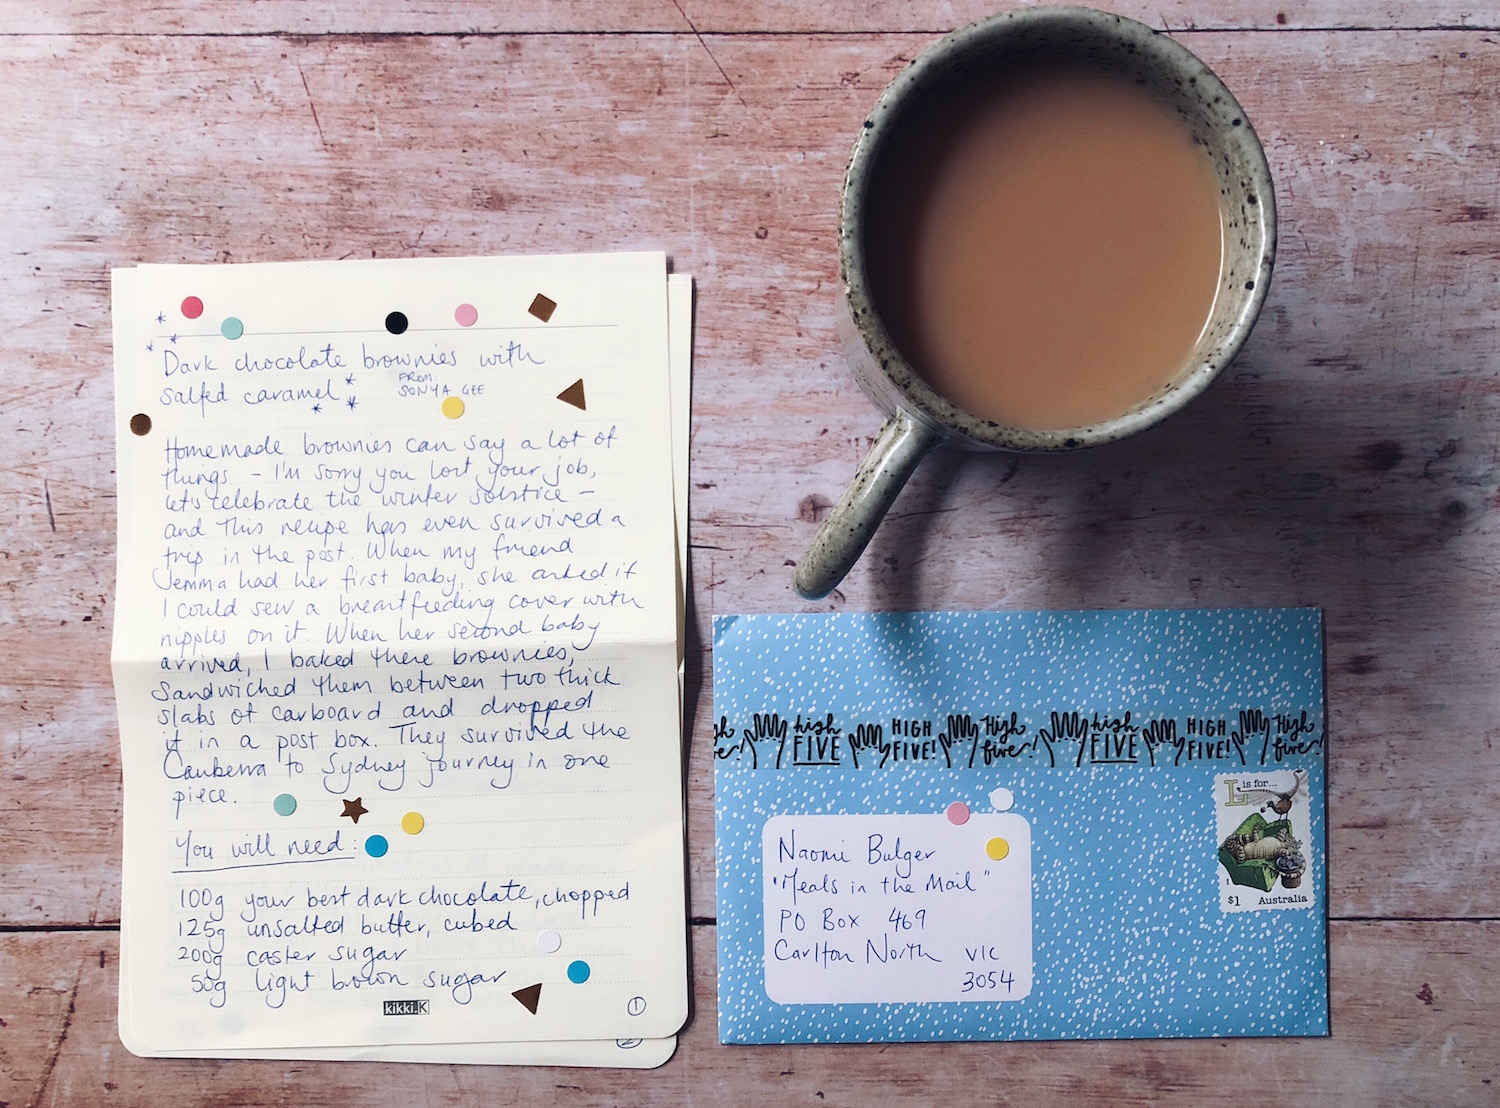
"Home-made brownies can say a lot of things - I'm sorry you lost your job, let's celebrate the winter solstice - and this recipe has even survived a trip in the post. When my friend Jemma's second baby arrived, I baked these brownies, sandwiched them between two thick slabs of cardboard, and dropped them in a post box. They survived the journey from Canberra to Sydney in one piece."
Then Nanette in The Netherlands shared her recipe:
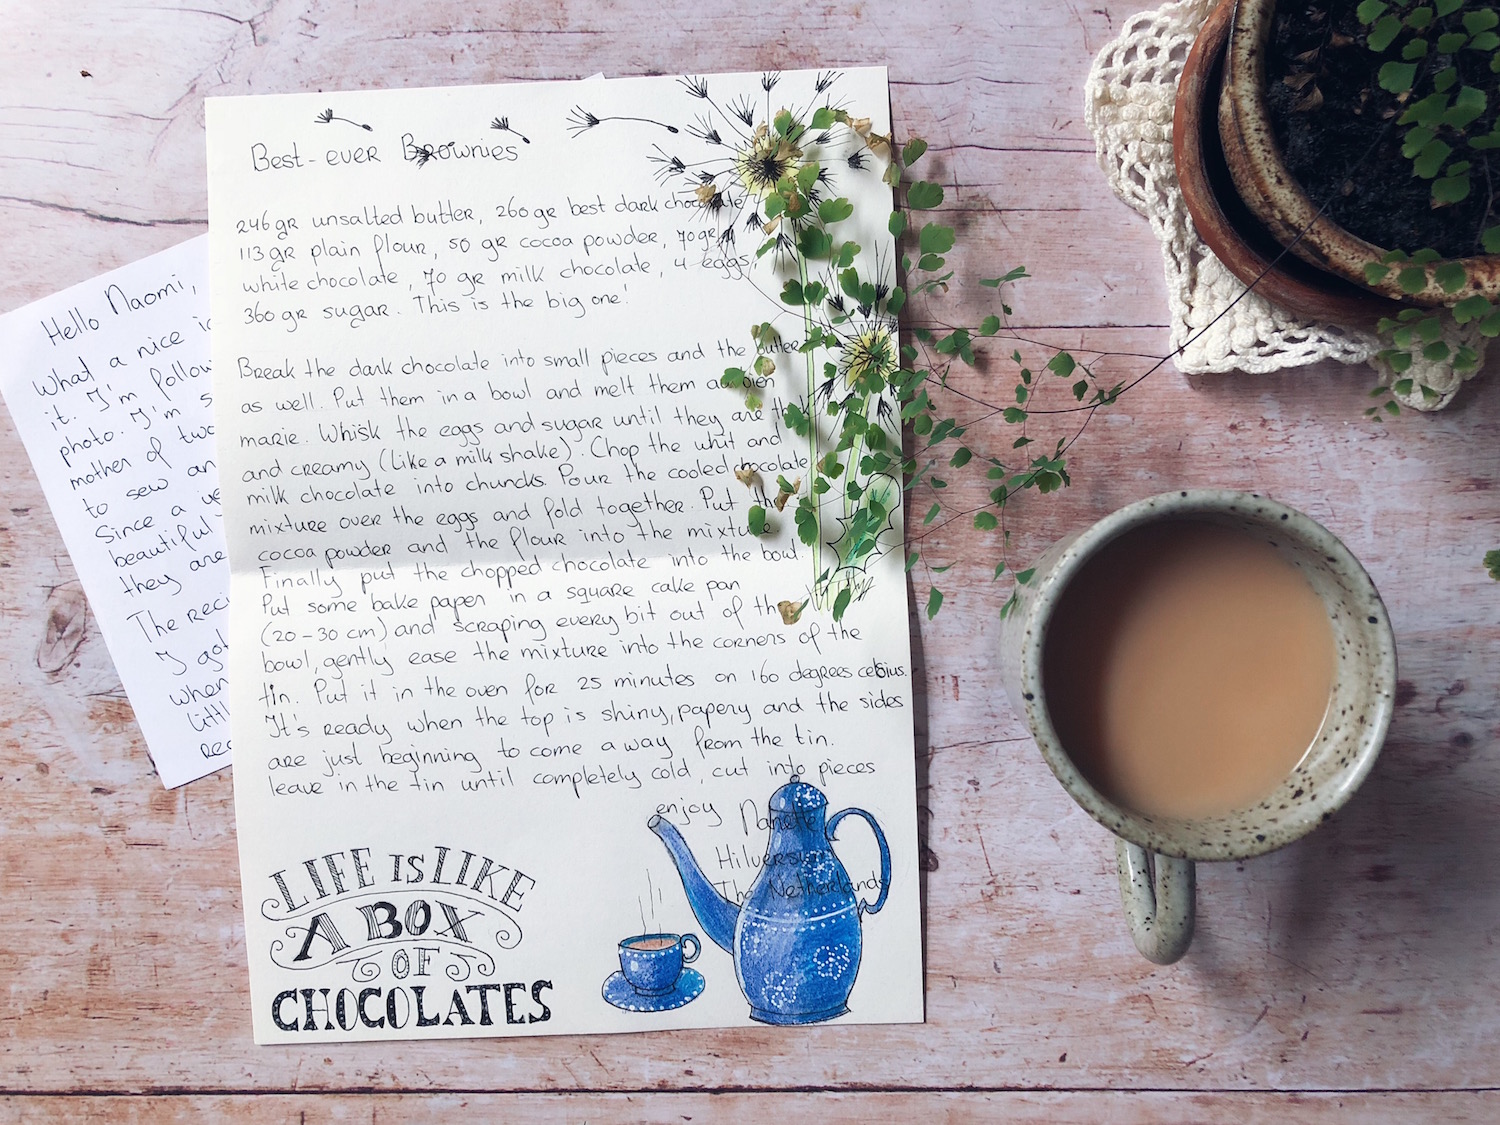
"I got this recipe from an English girlfriend when I was 25. Even 30 years later and some little changes, it is our favourite family brownie recipe. The whole family makes these brownies for birthdays, or just when someone is in need of chocolate or comfort food."
From Canada, Sherry shared buttermilk brownies and a tribute to her mother Elaine:

"This is my mom's brownie recipe and I can't even begin to tell you how many of these I have enjoyed over the years. My mom is an amazing woman... in addition to raising three kids with a husband who was away much of the time, she worked full time and still managed to be there for all of our girl guide meetings and art shows. The brownies were and are still a go-to recipe that even the pickiest eaters enjoy."
Jessica in Australia shared the recipe for Caramello brownies that won her boyfriend's heart:

"I first made these to impress my boyfriend and it must have worked because we're still together seven years later! They're always a crowd-pleaser and make your house smell great when they're baking."
And then from Denmark, Linea shared her hygge-inducing Lazy Brownie recipe:

"This cake tastes like a little piece of chocolate heaven if you use good ingredients and a tiny bit of love! I love that moment of silence when everyone takes a bite and just enjoys the chocolaty-ness! My favourite thing to bake in winter-time and eat with a cup of tea."
Laura in New Zealand shared the brownie recipe that helped her make it through some tough times:

"This recipe belongs to Kate, my boss at the New Brighton Library in Christchurch. Even though both of us no longer work in that library, her brownies helped the team get through some rough patches. They never let me down."
And in Austria, Miya shared a recipe for olive-oil and sea-salt brownies that came to her via a friend in America, who adapted it from a recipe in the NY Times:

"I love this recipe for several reasons. Firstly, it's genuinely easy but decadent and delicious! Secondly, my husband produces olive oil in Greece so it's one of my favourite things to make for him if he needs something to showcase his products - an act of love, if you like. Last but not least, it was given to me by my hot-mess New Yorker friend Meaghan. We met in our first week of moving to Vienna 10 years ago, and have lived in and out of each other's homes ever since, sharing a love of music, baking and the charming contradictions that make Vienna what it is. So I'm passing this recipe on to you and your community in the spirit of our friendship and the city it was born in. Wholesome yet a little decadent, simple yet a little extravagant, familiar and cosy but also a bit of a hot mess. And if you ever come to Vienna, you're invited to coffee and cake!"
So if you're wondering which of these seven recipes for brownies I'll share in the finished book, the answer is...
All of them. Naturally! Firstly, because this cook-book is not only about the recipes, it's also about the stories, the memories, the connections, and of course the mail. And secondly, because maybe you might want to try a little experiment when you read the book: a brownie bake-off for you and your friends, shall we say? I wonder what your favourite secret ingredient will be. Sea-salt? Caramellos? Buttermilk? Olive oil? A mother's love?
Meals in the Mail is a cook-book project celebrating meaningful, nostalgic and comforting recipes from close to 250 people from all over the word, written by hand, and sent by post (often with stunning illustrations on the recipes, or the envelopes, or both).
People who sent in recipes for meals in the mail will all receive a copy of the e-book for free, and get first dibs at buying the physical cook-book, which will be on a limited print-run.
If you'd like to be among the first to hear when both versions of the cook-book are available for sale, and to get updates on the projects and sneak peeks at the recipes, the best way is to sign up to my newsletter (right now I'm also giving away a copy of my mini e-book "Making Mail: 10 steps to writing letters that become keepsakes," to all subscribers).
And now, back to the question I asked at the start of this blog post. I'm dying to know: what's your go-to comfort food recipe? (Is it brownies??)

21 thank-you letters to write today

Happy World Post Day, dear friends!
Today, 9 October, is World Post Day, an official UN-sanctioned "day of observance." Every year, more than 150 countries celebrate World Post Day in a variety of ways, some countries even observing the day as a public holiday. (The rest of us can live in hope).
Adding oomph to World Post Day, the world has also been celebrating International Letter Writing Week - the week that includes 9 October - for the past 60 years. Established by the Universal Postal Union in 1957, International Letter Writing Week aims to "encourage world peace by encouraging cultural exchanges among the people of the world, through letter writing." World peace, friends.
That goal is every bit as relevant today as it was 60 years ago, so I wondered if you'd like to join me in a mini-challenge, starting today, to write one letter a day, all week. But there's a twist: all seven letters need to express gratitude. Can you do that? Spend seven days feeling all the gratitude and expressing all the thanks, in writing? Seven thank-you letters in seven days. It's totally achievable, yes? (And don't forget folks, this is for world peace).
Do you want to make your challenge public, so we can all cheer you on? Use the hashtags #worldpostday and #7gratitudeletters to show the world what you're doing.
I'm here to help. By way of inspiration, I've shared 21 gratitude prompts below, to get you thinking about the people you might like to write to this week. They are borrowed from a much bigger list of 40 gratitude prompts and 100 letter-writing prompts, which I share with students in my letter-writing and mail-art e-course, The Most Beautiful Letter You Have Ever Written.
Use these prompts any way you like. Maybe they'll provide you with literal inspiration, or maybe they'll help you think creatively, about the other people in your life who would appreciate a little note of thanks from you.

21 gratitude prompts
- Thank your postie for delivering the mail through rain, hail, snow, wind, heatwaves and unfriendly dogs (leave an anonymous letter in a public post box)
- Thank that bookstore employee who made some really great recommendations
- Thank your mum or dad for, you know, your existence
- Thank the barista who makes your coffee just the way you like it
- Thank your grandmother for the excellent scones
- Thank that Etsy seller for putting a personal touch on their sale
- Thank your partner for enriching your life
- Thank your school teacher for inspiring you to learn
- Thank your child’s school teacher for going above and beyond
- Thank your green-grocer for sourcing those great organic apples
- Thank a politician who actually did something good (nobody thanks politicians!)
- Thank a musician for filling your life with song
- Thank your friend for having you to dinner
- Thank your aunt for the birthday card
- Thank your children for making you laugh
- Thank your favourite blogger for working so hard to put out quality, free content
- Thank your favourite podcaster for the same reason
- Thank a charity you support for the good work they do
- Thank an author for the inspiring read
- Thank the housekeeping staff of somewhere you holidayed
- Thank your future self for learning the art of gratitude (hide the letter in a book
* Download the list here if you'd like to print it off to take it with you, and of course don't forget you can always pin it for later. x
ps. If you're in the mood for even more letter-writing inspiration, I want to remind you about my letter-writing and mail-art e-course, "The Most Beautiful Letter You Have Ever Written."

Over four weeks, I will guide you through multiple methods of making beautiful mail-art and creative, handmade stationery; teach you the art of writing and storytelling; help you forge personal connections in your letters and find pen-pals if you want them; and share time-management tips so even the busiest people can enjoy sending and receiving letters. There's also a host of downloadable resources, and access to my own private mail-art pen-pal group. Registrations are open right now, and you can find out more here.
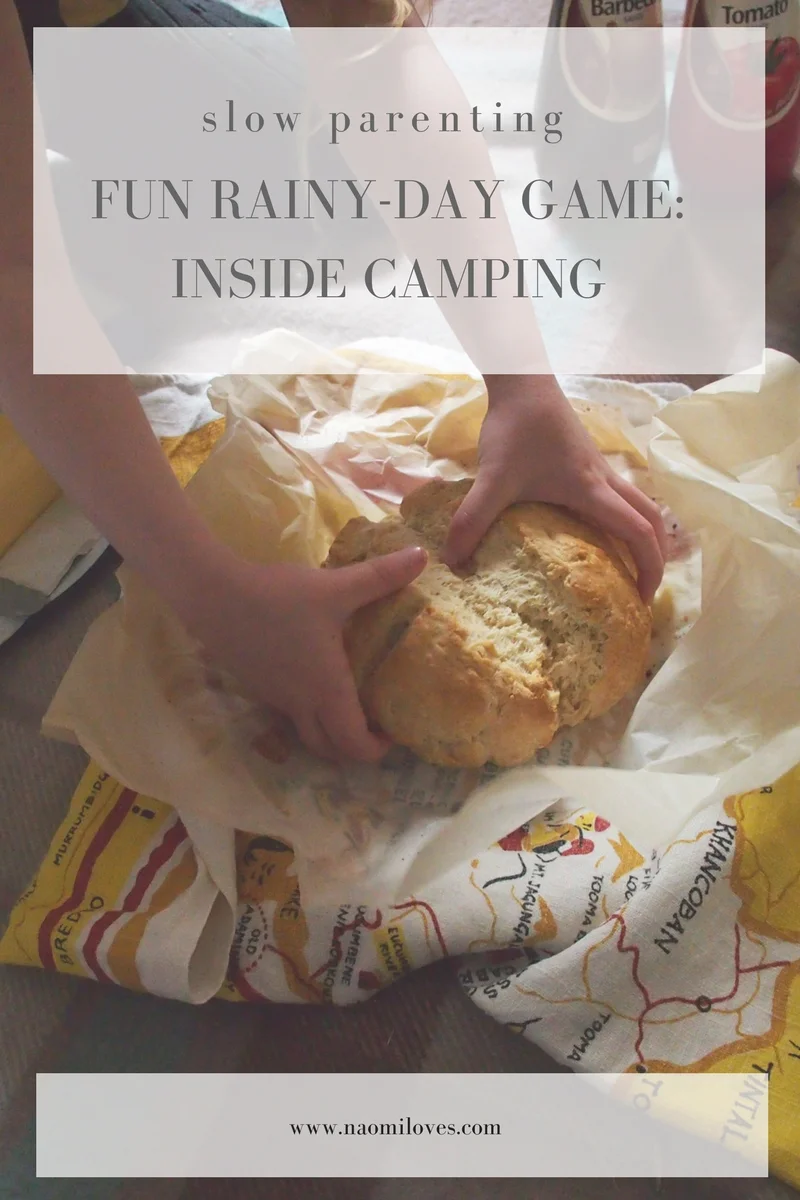
Inside camping
Get ready kids, we are going camping!
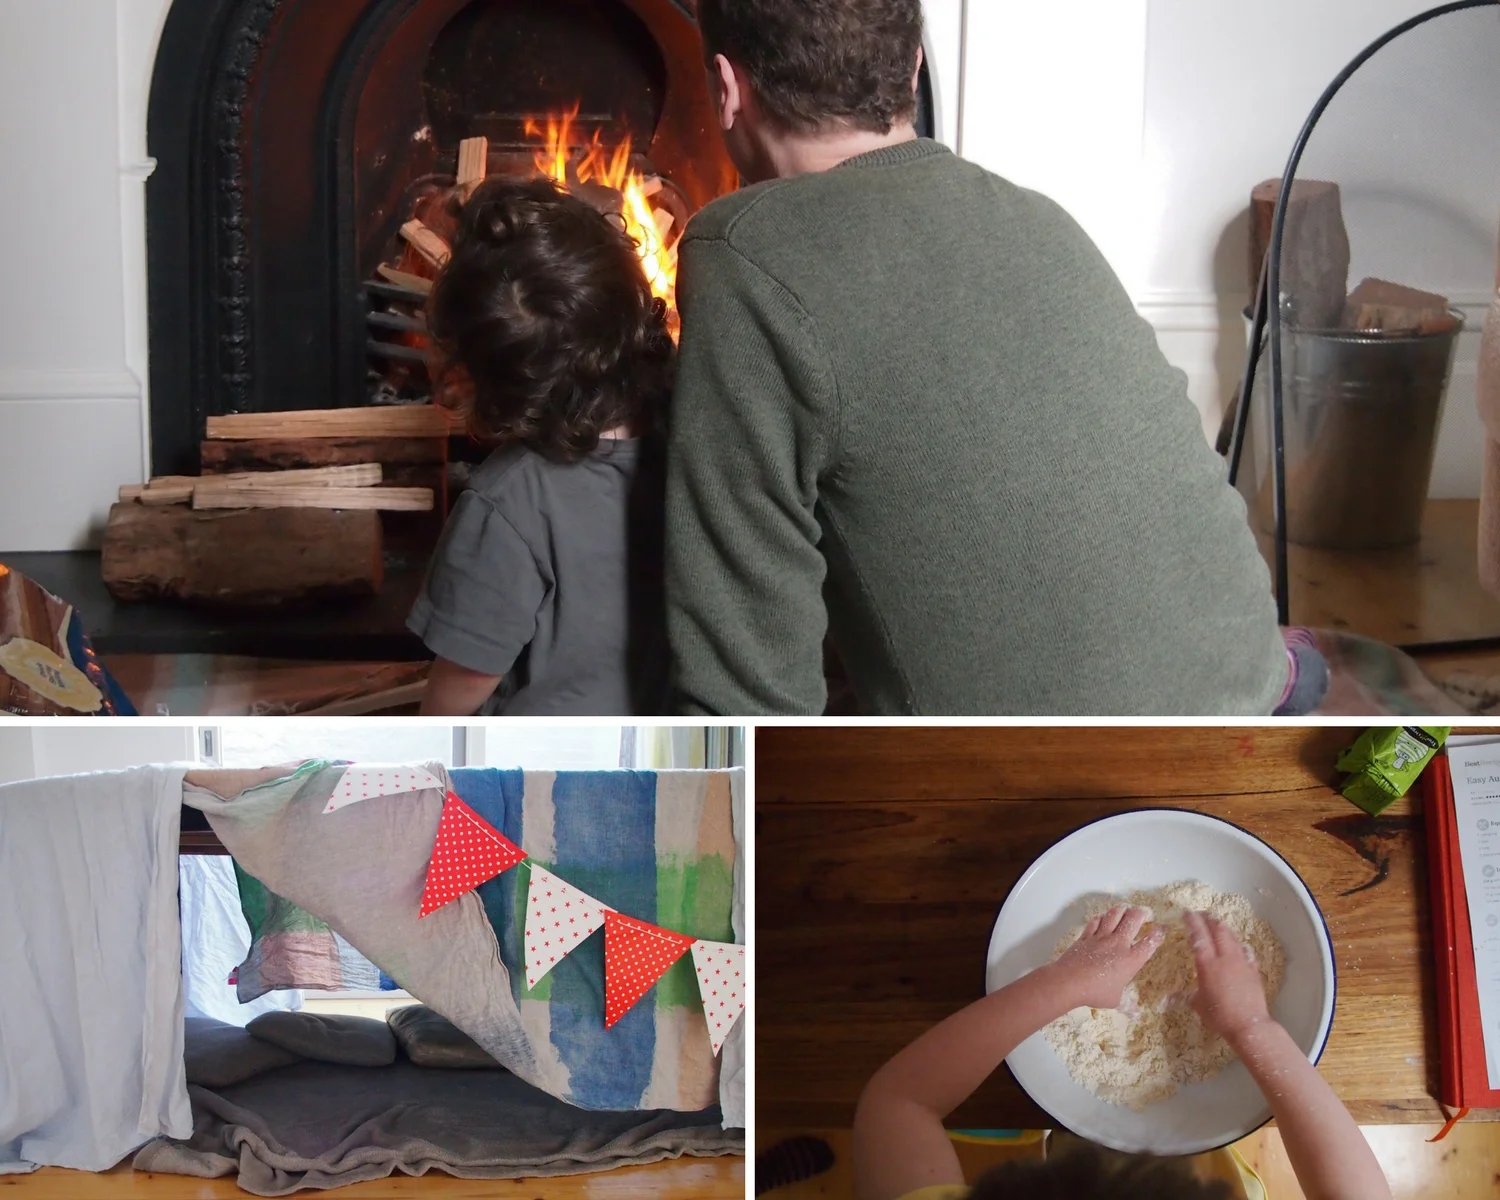


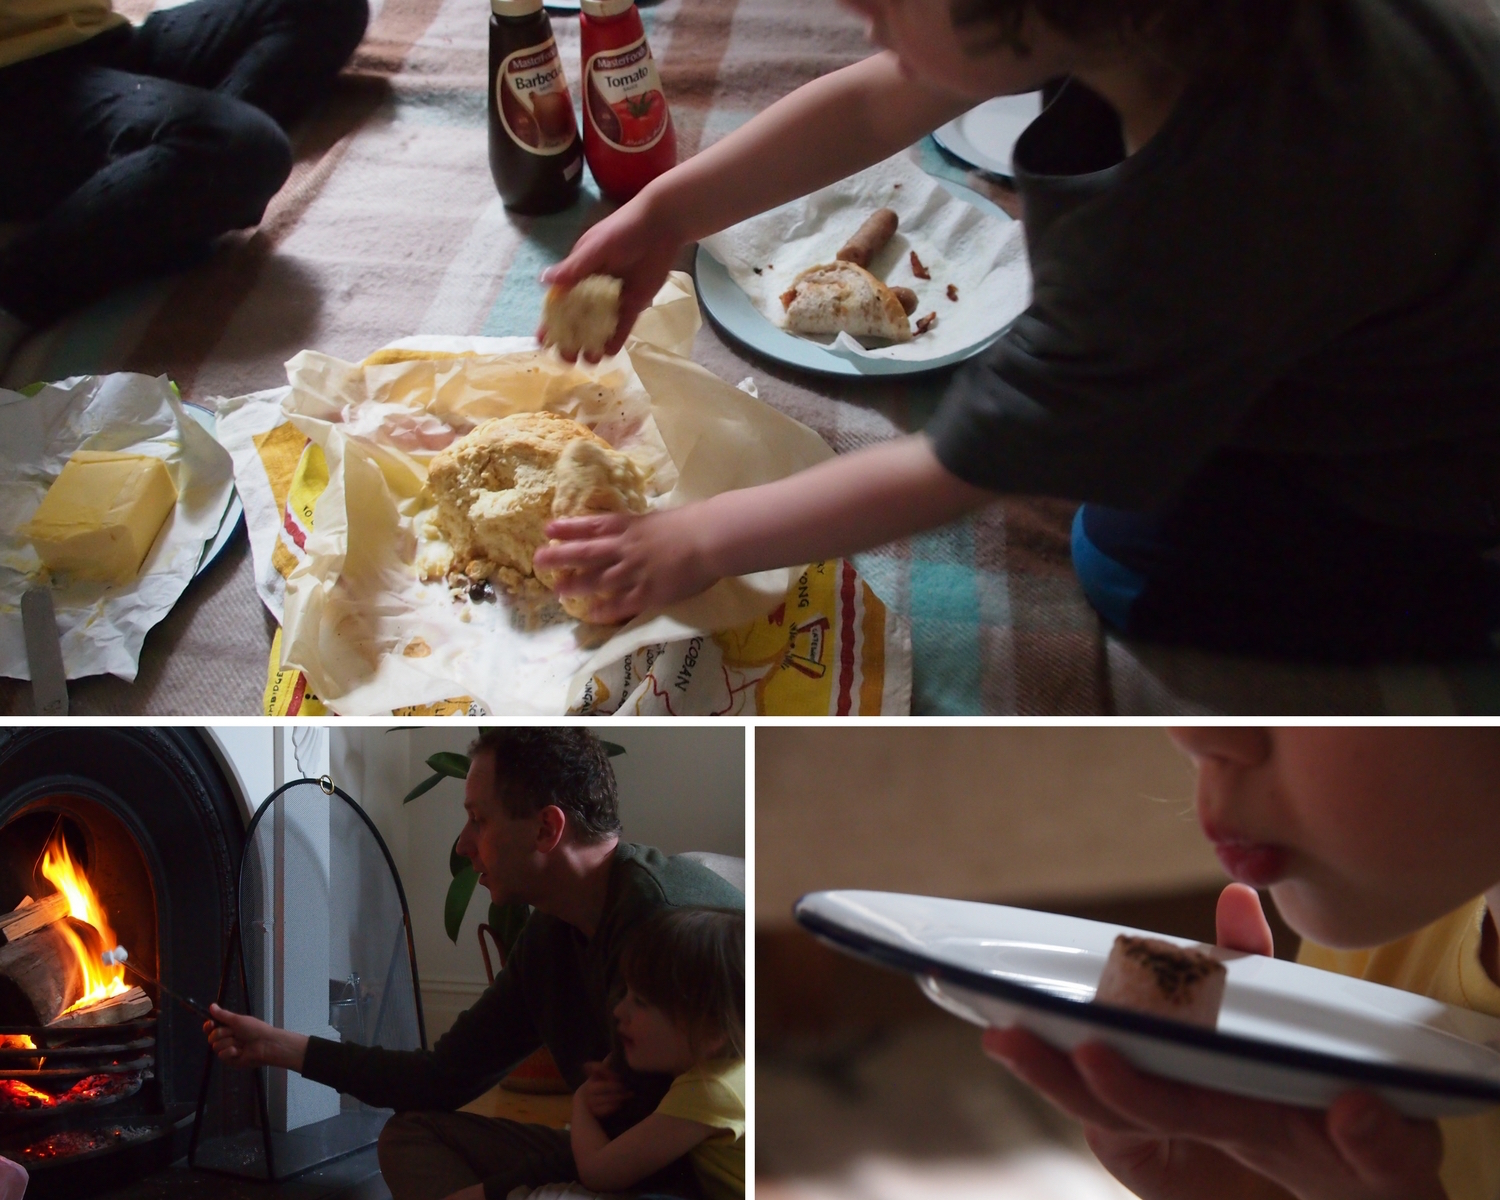

First, pitch the tent. We'll need damper, can somebody rub butter into flour? Light the campfire.
All set? Let's play some card-games on the picnic rug. Snap. Go Fish. Close your eyes and guess what food I'm putting into your mouth. Oh no! Who could have predicted that game would end in tears? Shall we snuggle inside the tent for a little while, and tell spooky stories?
Dinner time! Who wants another sausage? Can you pass the damper? Cocky's joy, anyone? I have a great idea: let's roast marshmallows!
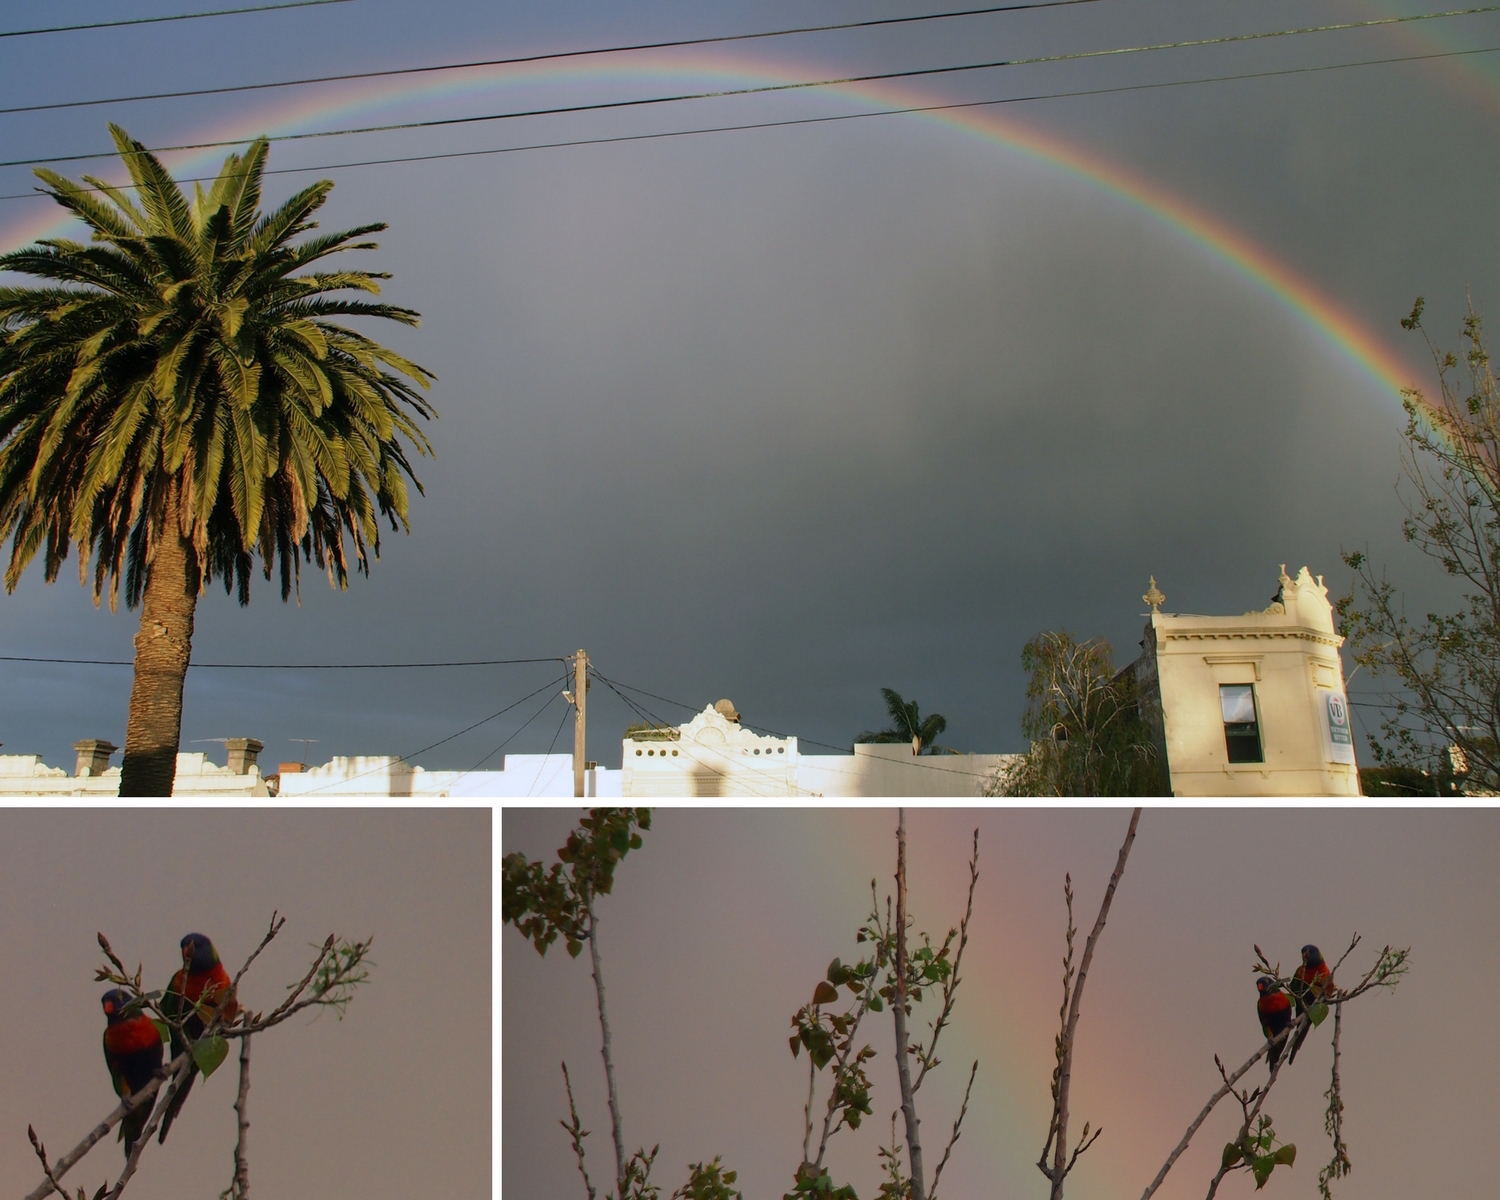
WHAT a sky! The rainbow lorikeets are loving it, too, they are making quite the racket. I think it has stopped raining.
But brr, it's getting cold, and almost dark. I have hot milo in the thermos. Come on, let's cuddle next to the fire and look for pictures in the flames until we fall asleep.

Have you ever tried inside camping? It's a fantastic rainy-day activity, and has the benefits of being warm, cosy, and completely screen-free!
I've made you a handy guide to inside-camping set-ups, games and food (including a damper recipe that can be adapted for cooking in a campfire or in the oven). You can download that here, and of course don't forget you can always pin it for later. x