The Easter craft challenge #2 - hidden messages
 Last year I saw this post about hiding messages, fortune-cookie-style, inside eggs on B for Bel and couldn't wait to try it for myself. As with many things in life, I didn't get around to it in time, but this year I persevered and managed to make three little Easter eggs for my friends. It was a bit time consuming, but definitely worth it, and not too tricky.
1. To remove the egg from the shell, make a tiny hole in both the top and bottom of the egg. I used a sewing needle and gently tapped it with a pen until it broke through the shell. Continue working on the hole at the bottom to make it a bit bigger. From the bottom hole, push the needle right up inside the egg to break up the yolk. Then hold the egg over a bowl and blow through the top hole to make the egg filling come out the bottom. This takes a little while but once you get the hang of it it's not too bad.
Last year I saw this post about hiding messages, fortune-cookie-style, inside eggs on B for Bel and couldn't wait to try it for myself. As with many things in life, I didn't get around to it in time, but this year I persevered and managed to make three little Easter eggs for my friends. It was a bit time consuming, but definitely worth it, and not too tricky.
1. To remove the egg from the shell, make a tiny hole in both the top and bottom of the egg. I used a sewing needle and gently tapped it with a pen until it broke through the shell. Continue working on the hole at the bottom to make it a bit bigger. From the bottom hole, push the needle right up inside the egg to break up the yolk. Then hold the egg over a bowl and blow through the top hole to make the egg filling come out the bottom. This takes a little while but once you get the hang of it it's not too bad.
2. Rinse the eggs to clean out the last of the yolk and white. I later learned that submerging them in salt water was the best for this job, whereas I just rinsed them with water from the tap (sorry dear recipients if there are eggy remnants in your presents. Gross!).
3. Paint your eggs in any colour you like. I painted mine a pale yellow colour, because I wanted a nice contrast to the black stencils I planned to use later. I found the best way to paint them was to use toothpicks inside the holes so that I didn't have to have my fingers all over them. I stood the toothpicks in lumps of BluTac to hold the eggs upright while they dried between coats of paint (I used three coats and they actually could have done with more if I'd had the time).
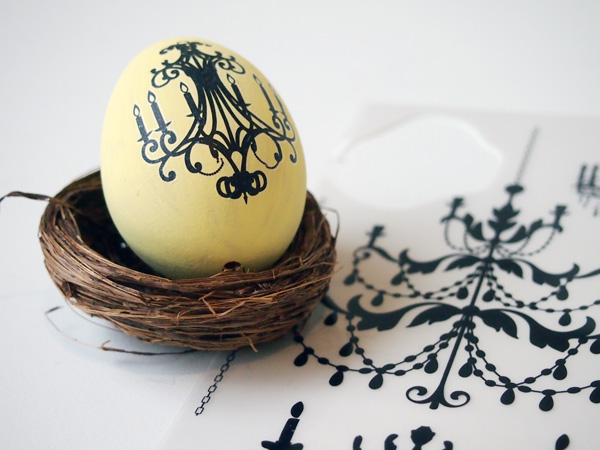
 4. To decorate the eggs, I used stencils, or "rub-ons," that I found at Kaisercraft at Uni Hill factory outlets. I am so happy with the results! Just cut out the portion of the image you want to transfer, and hold it firmly in place over the egg. Using the back of a pen or pencil (or anything else hard), gently rub over the image. Because the egg is round, you'll need to gently hold the transfer piece by piece over the areas you want to rub, because if you try to wrap it around the egg, the stencil will break apart and you won't get a clean transfer.
 5. Write your special message on a tiny piece of paper. Remember: the paper should be shorter than the egg so it can fit inside. Don't make it too long, either, because you will have to roll it up to make it fit inside the hole, and too long a note will make the roll too fat. I used tiny strips of brown paper. I found that rolling the message so that it wasn't exactly straight (making it 'taller' than otherwise) helped to thin it out to fit in the hole.
 6. I created a cone of paper and poured some gold glitter into the hole, so it would feel like a bit of a carnival for my friends when they broke the egg open. Once done, I covered the hole with clear sticky-tape to stop the glitter from escaping back out.
 7. As a final touch, I positioned the egg in an adorable little decorative birds' nest that I also found at Kaisercraft.
 What do you think? Let me know if you try this craft too!
* Coming up next week: plantable papier mâché Easter eggs with wildflower seeds * Last week: Easter snail mail using collage, stencils and wooden decorations
Sponsored by the good folks at Uni Hill Factory Outlets.